Posts

Showing posts from June, 2025

Easy Homemade Cheese

Image
This recipe for homemade cheese is very, very easy. No special equipment is needed. The texture of the cheese reminds me of feta, which I love. You can slice it, spread it on crackers and sandwiches and crumble it on your salads etc.  I used some of it on a chicken pizza, and wow, so delicious. It's fun to make too!  Chicken Apple Citrus Salad  with crumbled homemade cheese Here's the recipe that is customized to my tastes, but you can totally change up the flavors to the way you prefer. Easy Homemade Cheese All you need is 4 cups whole milk 2 tablespoons apple cider vinegar  4 tablespoons butter, melted salt to your taste 2 - 3 teaspoons garlic powder (optional) chopped herbs such as chives, thyme, rosemary, oregano (optional) Instructions 1 . Add the milk to a large pot on the stove. Heat it up until just boiling, stirring constantly so you don't scorch the milk. 2 . Take it off of the burner and immediately add the apple cider vinegar. Stir for a couple of minutes...

Repurposed Firepit - Make a Planter!

Image
Here's a repurposing idea for you - plant flowers in an old firepit.   I have had this firepit for about 13 years now. There is nothing I love more than an outdoor fire on summer evenings. But a few years ago, my son the firefighter said, "No fires this year, Mom. It's not worth it."  Even here in Washington, summers can be very hot! So I took his advice. I don't want a spark to go up and catch a neighbor's tree on fire. Yikes!! That would be very bad. Definitely don't need that in my life. It got me thinking about what to do with my cute little fire pit. Sell it? Well no, I really do love it and I might be able to use it again someday. Then a light bulb went off in my head. Until the day I can use it again, why not make it a planter? So that's what I did, and it turned out pretty cute! Since the firepit didn't have holes in the bottom, I filled it about 1/4 of the way up with rocks to provide drainage for the plants. If you want to drill holes in ...

Cake in Jars

Image
A few months ago, I had a get-together coming up and I thought I would make cake in Mason jars, so if anyone wasn't ready for dessert they could take one home. I just didn't fill them extra-full on that night so a lid would go on easily. The good thing about a dessert like this is that you don't have to eat it all at once. If you only eat half, just put the lid back on and place it in the fridge. Here's how to do it: Cake in Jars 1 . Make your favorite chocolate cake in a 9x13 sheet pan. Let it cool.  2 . Make or buy both caramel sauce and chocolate frosting. 3 . Place pieces of cake in Mason jars about a quarter of the way up, then cover with frosting. 4 . Add a second layer of cake and drizzle with caramel sauce. 5 . Top with caramel whipped cream, which is made by stirring some left-over caramel sauce into heavy cream and whipping it up like normal. It tastes delicious! 6 . Lastly, drizzle with more caramel sauce and add chocolate sprinkles. 7 . Store in the fridge. ...

Chardonnay, the Deer

Image
This is my deer. We named her Chardonnay because she was found, only a day old, in the Chardonnay Vineyards of Fetzer Wines which was a couple of miles from our home. Her mother was unfortunately killed by some dogs. My husband at the time brought her home and we raised her up. My dog Esther became her mother and did everything for her that a good mother should. We bottle fed her goat's milk for four months then moved her onto some grain and hay. She thrived!! She was our constant sidekick. She went on walks with us and the dogs, kicking and squealing the whole way. We lived in the woods so no need for leashes. When we ate outside in the summer she would lie down beside the table with us. When we had company and campfires outside she was with us. And, yes, she did come in the house to say hi all the time. She was potty trained and never ever went in the house. She was just the bestest friend you could ever ask for. So sweet and loving. She did survive the 2012 forest fire, which wa...

You Are Not Too Old

Image
I found this quote and love it so much!  "You are not too old And it is not too late." R.M. Rilke I don't share many personal things but I think I am meant to share some inspiration today. I am about to turn 59 in July and have been through so much the last 14 years. Sometimes I didn't know if I was going to be able to come back from everything that happened.  In 2012 there was a forest fire that took my country home, land and everything in it plus several of my animals. Soon after came a divorce. There were a couple years after this where there was much soul searching but not with much luck. I was pretty depressed. Next came a big move back to my home state of Washington. Then a few jobs where I worked endless hours and hated every second of it with long hours stuck in traffic.  The only thing left for me to enjoy was my page on FaceBook® that I created and my gifts of cooking, baking and my art. Those are the things that have kept me going, plus my children of cours...

Easy Herb-Drying Rack

Image
Do you want to know how to make the easiest herb drying rack ever? It doesn't cost a thing except for twine and it looks really nice!  First you need to find a long stick. Next wrap a bunch of twine around one end and string it out enough to reach the other end leaving enough in the middle to hang it with. Secure it to the other end of the stick, and hang it up. Now tie some twine around the stems of your herb bunches and hang each of them from the branch. Easy peasy!  I have always dried my herbs above the kitchen sink. Not only is it pretty but oh gosh, they make your kitchen smell so very nice! In the photo I have lavender, cinnamon basil, pineapple thyme, and rosemary.  I love it!! Dana ~ Easy Herb-Drying Rack Supplies a long stick or branch twine herb bunches Instructions 1 . Wrap twine around one end of the stick and secure it with a knot. String it out to the other end of the stick, leaving enough in the middle to hang it with. Wrap the twine around the other end o...

Lavender Shower Fizzles

Image
My name for these little wonders is Shower Fizzles! What you do is set them on the corner edge of your tub or on a shelf while you take a shower. It turns shower time into a spa experience! It smells amazing when the steam completely soaks into the tablet. It will bubble up and fizzle until it dissolves releasing the amazing aroma. You can throw them directly on the shower floor but if I have flowers in them I prefer to put one on a small dish in the corner of the tub. That way I don't have flower petals going down my drain.  I made these lavender because I have a bunch growing in my yard so I have lots of lavender around. It's such a relaxing experience right before bedtime.  Lavender Shower Fizzles Ingredients 4 cups baking soda 2 cups citric acid approximately 3/4 to 1 cup witch hazel approximately 60 drops of lavender essential oil Instructions 1 . Add the baking soda and citric acid to a large bowl. Then using a large sifter, sift the mixture into another large bowl. That...

M&M®, Semisweet and Milk Chocolate Chip Cookies

Image
I made these delicious cookies today with semisweet chocolate chips, milk chocolate chips, and Peanut M&Ms.® It's kind of one of those cookies that you use what ya got. They are great! You can't tell in the photo but they are big!  For Large Cookies Step 1. I use an ice cream scoop for the big scoop and a regular-sized cookie scoop to add another scoop to the top of the ice cream scoop. Step 2. Then push down slightly on the stacked scoops. By doing this you will make your cookies nice and ooey gooey in the middle and crunchy on the outside. Look for my new cookie cookbook, My Olde Country Home: Vintage Cookie Recipes , coming out soon on Amazon. You can get a sneak-peek of the book  here . This big cookie is not in it, so I will share the recipe with you.  M&M®, Semisweet and Milk Chocolate Chip Cookies Ingredients 1/2 cup salted butter 1/2 cup shortening 1-1/2 cups brown sugar 2 eggs 1 teaspoon vanilla extract 2-1/4 cups all-purpose flour 1 teaspoon baking ...

Starting Seeds in Containers

Image
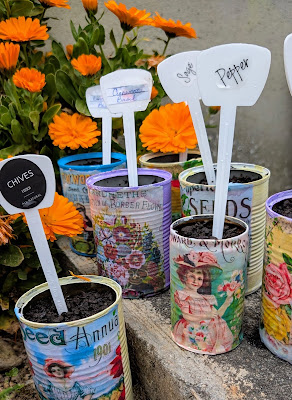
I got lots of planting done today!! All seeds. Let's see - I planted three kinds of tomatoes, which will stay indoors for 2-3 weeks before I take them outside.  And there were pickling cucumbers, two kinds of squash, two kinds of pumpkins, peppers, basil, dill, cinnamon basil, sage, chives, thyme and zinnias. I planted all of the herbs into the decorated tin cans I made. I will let them get to 2-3 inches, and then transplant them.     Everything else I planted into foil baking pans. I buy several of these pans in the spring to start my seeds in. It works well. If you get them at the dollar store, it's very affordable. The grocery stores will charge you around $3 for the same thing.     Another tip I'd like to share is that I keep dated bags with the seed packets I've already planted for the year. That way if I need to go back and read the instructions again, I can find them easily. This is especially helpful during transplanting time for those seeds.   ...