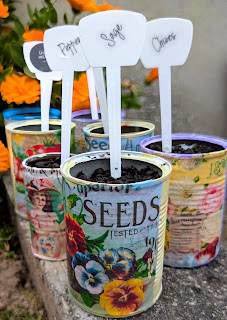
Tin Can Planters
I made these adorable Spring planters out of my dogs' food cans, some paint, some instant coffee and cinnamon to make them look rusted and old, Mod Podge® and some printables I found on the Internet. I placed rocks in the bottoms of the cans for drainage, dug up some pansies from my garden, then added potting soil to plant the pansies in. Now I have these sweet little planters for just pennies.
Once the cans are made, you can use them for whatever you wish. I made mine Spring themed because of what time of year it is, but you can make them for all the seasons. My next project is to come up with some herb labels and plant herbs to go on my kitchen window sill.
Supplies
used tin cans
acrylic paint
sandpaper (optional)
Elmer's® glue
instant coffee powder
ground cinnamon
vintage labels
Mod Podge®
pebbles
potting soil
Instructions
1. First, remove the original labels from the cans and wash them thoroughly. Dog food cans are a nice size, but you can use whatever size you have. I run mine through the dishwasher.
2. When the cans are clean and dry, paint them with whatever color you want and let dry. Usually they will need 2-3 coats of paint. I like to sand some of the paint off at this point to make them look older but that's up to you.
3. Next make a faux-rusting mixture of instant coffee powder, Elmer's® glue and a little water - just enough water to make a nice paste. Brush the coffee paste on the painted cans and sprinkle some cinnamon on in places. Let the cans dry completely before adding the labels.
4. Select some vintage images for your labels. You can find them on the Internet, or see some of my favorites below. For dog food-sized cans, print them out at 4 inches by 6 inches on regular computer paper. Tear around the outside of each printed label to fit the size of the can you are using. They look much better torn than cut straight with scissors.
5. Once your faux-rusting mixture has dried on the cans, paint the back of the label with Mod Podge® and stick it on. Then paint the Mod Podge® all the way around the can to seal it, including the front and edges of the label. Let the cans sit to dry.
6. When the cans are dry, you can use them as planters. Add a few pebbles in the bottom for drainage and then hold a small plant in the can, filling in around it with potting soil.
Printable Crafting Pages
copyright 2025, Dana Meier, My Olde Country Home
Dana Meier is a caterer, cookbook author, online content creator and purveyor of historic crafts in Washington state. Her first cookbook was published in 2023.
My Olde Country Home cookbook series:
Vol. 1 - Olde Fashioned Christmas Desserts
Vol. 2 - Vintage Cookie Recipes
available on Amazon®


Comments
Post a Comment